Luminar NEO: How to use the Erase Tool (2025 Update)
Mar 11, 2023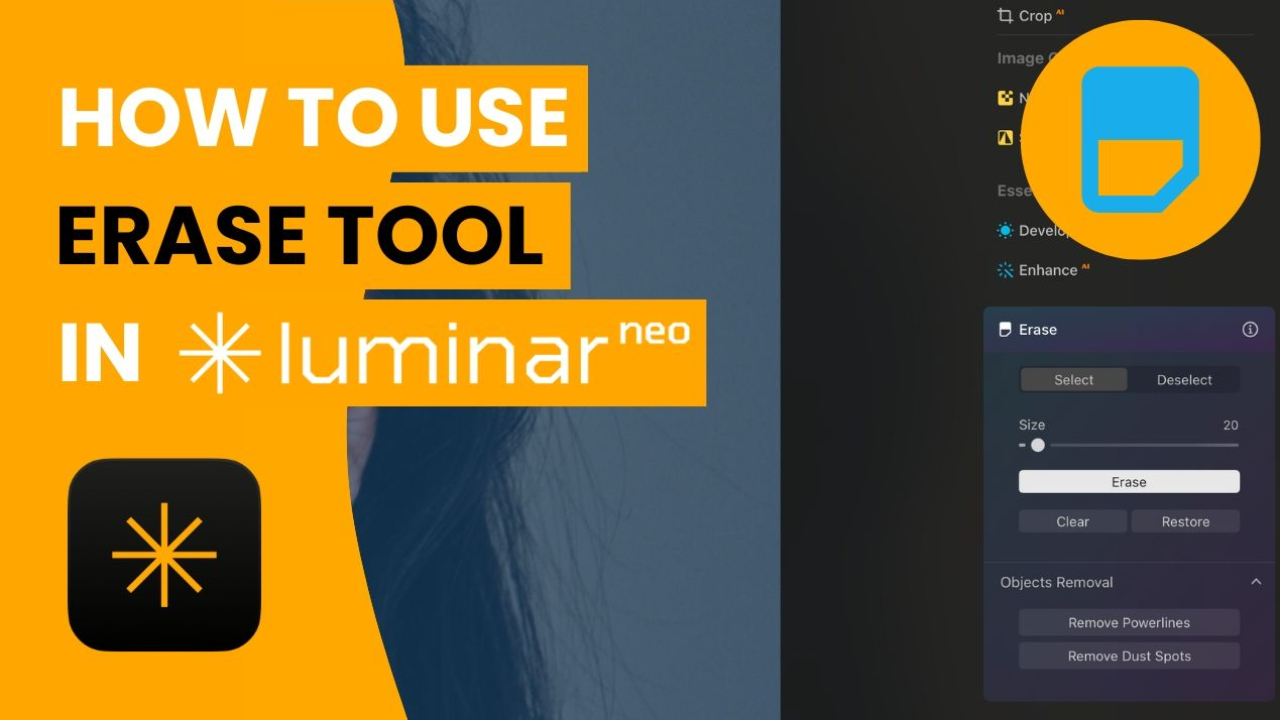
🔄 2025 Update: This post has been updated with a brand-new video tutorial using the latest version of Luminar NEO. Watch the updated video below to learn how the Erase tool works today.
When it comes to erasing objects, Luminar NEO and its Erase Tool are easy to use. All you need to do is to brush over the objects you want to remove and click the Erase button. On top of it, the Erase tool also includes the Remove Powerlines and Remove Dust Spots tools that make erasing even easier.
🎁 FREE GIFT: Want to edit faster and with more confidence in Luminar NEO?
Download your Luminar NEO Tools A–Z Cheat Sheet, a beautifully simple PDF that explains every tool, plus bonus tips on blend modes and masking. Click here to get your gift!
In this article:
- What is the Erase Tool?
- Introducing the Erase Tool sliders
- Getting started with the Erase Tool
- Video tutorial
- Luminar NEO
What is the Erase Tool?
The Erase tool works non-destructively and does not use layers. When you select the Erase tool, your cursor becomes a brush. When you brush over areas you wish to erase, a red overlay shows your selection.
Introducing the Erase Tool sliders
Select and Deselect
By default, the Select button is chosen. When brushing over an image with Select chosen, you select areas to erase (indicated with a red overlay). By clicking the Deselect button, you can deselect areas to erase (removing the red overlay).
Brush Radius
This slider increases or decreases the brush size. You can also use the left and right bracket keys ([ ]) to decrease and increase the brush size. It’s a good idea to keep the brush only slightly larger than the size of the object or blemish you’re erasing.
Erase
Click this button to erase areas of the image that you’ve selected (indicated with the red overlay).
Clear Selection
Click this button to clear all of your current selections so you can start over.
TIP: If you are using the Erase tool and accidentally select an area you no longer want, you do not need to use the Clear Selection button to start over. Instead, you can undo one stroke at a time. While in the Erase tool, choose Edit > Undo or press Cmd+Z (macOS) or Ctrl+Z (Windows) to undo the last brush stroke
Getting started with the Erase Tool
The Erase Tool serves a similar purpose to the Clone tool, allowing you to remove unwanted objects or details. But its approach is different from Clone. Rather than setting a source point for pixels, with Erase you click and brush over unwanted areas. Luminar NEO then examines the surrounding pixels and generates a new texture based on its awareness of what’s nearby in the photo.
The Erase Tool also matches the original pixels' texture, lighting, and shading. This approach is often quite effective, as this tool is fast and easy to use.
Erase Tool:
- Open an image that has items you’d like to remove.
- Switch to the Erase tool by going to the Essentials section of the Edit panel or by pressing Cmd+E (macOS) or Ctrl+E (Windows).
- Use the Zoom tool (in the bottom shortcut toolbar) and the Hand tool to explore the image’s details. Hold down the spacebar to temporarily switch to the Hand tool.
- When you find an area you want to erase, simply click and brush over it.
- You can adjust the size of the brush using the Size slider.
- To subtract from selected areas, choose the Deselect button. The Select button, which is chosen by default, lets you add to selected areas. You can also press the X key to toggle between selecting and deselecting pixels with the Erase brush.
- Click the Erase button to remove selected areas.
Erase Tool video tutorial
Watch the full video tutorial covering all sliders in this tool.
Luminar NEO: Edit Smarter with Powerful AI Tools
Luminar NEO is Skylum’s award-winning photo editing software, designed to help photographers achieve stunning results faster, thanks to its powerful AI-driven tools and user-friendly interface. Whether you're a beginner or a seasoned pro, Luminar NEO makes it easy to enhance landscapes, portraits, and everything in between.
Packed with intelligent features like Enhance AI, Sky Replacement, and advanced masking, it's a fantastic alternative to traditional software like Photoshop, especially if you want professional results without the steep learning curve.
👉 Click here to explore Luminar NEO.
💬 Don’t forget: you can get 10% off with our exclusive code CPNEO10 at checkout!
Meet LumiBot, Your Personal Luminar NEO Assistant
Need help using Luminar NEO? LumiBot is your 24/7 AI-powered assistant that answers your questions, explains tools in plain language, and helps you edit with more confidence and less frustration.
👉 Click here to learn more about LumiBot and start editing smarter.